Lassen Sie sich von Istar mit unserer Erfahrung und unserem Know-how beim Start Ihres Projekts unterstützen!
Laden Sie Ihre Designdateien und Produktionsanforderungen hoch und wir melden uns innerhalb von 30 Minuten bei Ihnen!
All materials are not the same. Some are soft, and some are very hard. We call this feature material hardness. Understanding this is a very important part of being successful in many jobs, like engineering or CNC-Bearbeitung.
This article is for you if you have ever asked what makes one metal harder than another. I will explain everything you need to know about the hardness of materials. We will look at what material hardness is. We will also look at why it is so important and the different ways we test for it. When you finish reading, you will know how to pick the right material for your job. You will also understand the test reports you see.
When we talk about material hardness, what does that really mean? It is a simple idea. Material hardness is how well a material can stop its surface from being changed. Think about trying to scratch a piece of wood with your fingernail. You can probably do it. Now, try to scratch a piece of steel. You can’t. This is because the steel has a higher material hardness.
This hardness refers to the resistance of a material to plastic deformation. Plastic deformation is a technical way of saying a lasting dent, scratch, or cut. The ability of a material to withstand this kind of damage is its hardness. It is not the same as strength. A material can be strong but not very hard. For instance, some soft metals can hold a lot of weight, but you can scratch them easily.
Knowing about material hardness is very important. It tells you how a material will withstand damage from use. Materials with higher hardness are better for tools that cut. They are also good for parts that rub against each other. The hardness of a material is one of the most important material properties to know before using a material in a project.
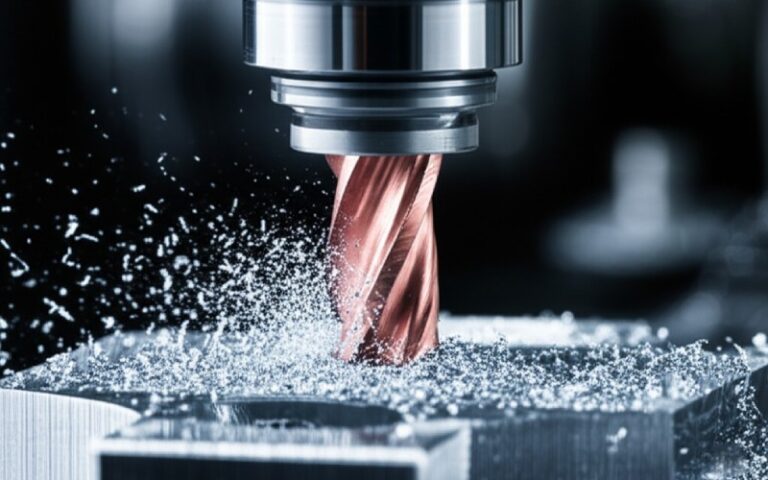
From my time with CNC machining, knowing the hardness of your material is more than just helpful. You have to know it. CNC machining means you cut and shape materials with very exact tools. If you try to cut a very hard material with a tool that is not hard enough, you will have a big problem. The tool will get dull fast or it might even break.
Knowing the material hardness helps you make smart choices. It changes the speed you run your machine at. It changes the type of cutting tool you use. It also changes how long that tool will last. For example, metals like hard steel need very different CNC machining settings than softer aluminum. A higher material hardness means you need to cut slower and use stronger tools. This helps you avoid mistakes that cost a lot of money and broken tools.
Before I start any CNC machining job, I always check the material hardness. This easy step helps me plan the work the right way. It makes sure that the finished part meets its requirements. If you work in making things, measuring material hardness is a very important part of checking for good quality. This is a simple hardness measurement that can save you a lot of time and money.

It might surprise you that there is not just one type of hardness. We usually talk about three main groups. Understanding these different types of hardness discussed in this part will help you understand the different hardness test methods.
The three main types of material hardness are:
There are several hardness test methods to pick from. So how do you pick the right one? Your choice is mostly based on the test material you are working with. You need to think about the material’s features and why you are performing the test.
For very hard materials, like hardened steel or ceramics, a Vickers hardness or Rockwell hardness test with a diamond indenter is usually the best choice. For soft materials, like aluminum or copper, a Brinell hardness test is a better pick. You could also use a Rockwell scale that uses a ball indenter. The Brinell hardness number is great for softer materials.
You also must think about the test piece itself. Is it big or small? Is it thick or thin? A Brinell hardness test, for instance, leaves a big dent. You cannot use it on a very thin part. The Vickers hardness test makes a very small dent. This means it is good for small spots or thin layers. Picking the right test method makes sure you get a correct hardness value.
I often suggest the Rockwell hardness test. This is because it is fast, simple, and used a lot. The machine gives you a numerical hardness value right away. So, there is no hard math to do. It is one of the most popular ways to determine the hardness.
This is how it works. The test uses an indenter, which can be a steel ball or a diamond cone. First, a small amount of force is applied to the material to set the indenter in place. This gets rid of any problems on the surface. Then, the main force is put on for a certain amount of time. This makes an impression on the test piece. The force is then taken away. The machine measures how much deeper the indenter went from the small force to the big force.
This depth is changed into a Rockwell hardness number. There are many different Rockwell scales. For example, HRC is for hard steels and HRB is for softer metals. You choose the scale based on the material. The Rockwell hardness test is a great test method for checking quality in a factory because it is so fast. This hardness test is very trustworthy.
The Rockwell test is not the only indentation hardness test. The Brinell and Vickers tests are also very important. They are especially good for certain materials like metals and ceramics. Both are great hardness test methods.
The Brinell hardness test uses a hard steel or tungsten carbide ball as the indenter. A heavy force is put on for about 10 to 30 seconds. After applying the testing load, you measure the width of the round dent left on the test piece. You use a formula to figure out the Brinell hardness number (BHN). This hardness test is good for parts made from molds because the big dent averages out any rough spots on the surface.
The Vickers hardness test is a little different. The indenter is used for this test is a tiny, pyramid-shaped diamond. This shape means it can be used on very soft and very hard materials. After applying the testing load, you measure the two lines that go across the corners of the small square dent. The Vickers hardness number (VHN) is then figured out. Because the dent is so small, this hardness test is perfect for thin materials. It is also good for testing small parts of a test piece.
Sometimes, you cannot bring the part you want to test to a machine. Maybe it is a giant pipe or a big steel frame. This is when rebound hardness, or dynamic hardness, testing is useful. It is a hardness test method you can carry with you.
The most common rebound or dynamic hardness test method is the Leeb hardness test. A small tool has a hammer inside that is pushed by a spring onto the test piece. The hammer has a hard tip. The tool measures the speed of the hammer when it hits the surface. It also measures the speed as it bounces back. The rebound hardness is figured out from the difference in these speeds.
The machine gives you a Leeb hardness value. This value can then be changed to other scales like Rockwell or Brinell. This type of hardness test is great for testing on location. It lets you determine the rebound hardness of very large things quickly and easily. This hardness test is a great example of rebound hardness at work.
Let’s talk about scratch hardness. The oldest and most famous hardness scale for this is the Mohs hardness scale. A German scientist who studies rocks, named Friedrich Mohs, made it in 1812. It is a very simple idea. The scale puts 10 common minerals in order based on if they can scratch each other.
| Mohs Hardness | Mineral | Can be Scratched By |
|---|---|---|
| 1 | Talc | Fingernail (2.5) |
| 2 | Gypsum | Fingernail (2.5) |
| 3 | Calcite | Copper Penny (3.5) |
| 4 | Fluorite | Steel Nail (4.5) |
| 5 | Apatite | Steel Nail (4.5) |
| 6 | Orthoclase | Steel File (6.5) |
| 7 | Topaz | Scratches Quartz |
| 8 | Corundum | Scratches Topaz |
| 10 | Diamant | Nothing |
The Mohs hardness test uses a simple method of scratch testing. To find the hardness of a material, you try to scratch its surface with a mineral that has a known hardness. For example, if a steel nail (about 4.5) can scratch your test material, but a copper penny (3.5) cannot, then the material’s Mohs hardness is between 3.5 and 4.5. It is not very exact for engineering. But it is a great, fast way to know what a mineral is when you are out in the field. This test method is perfect to measure the scratch hardness.
A material hardness chart is a great tool that I use all the time. It lets you compare different hardness values from different scales. Let’s say your client gives you a rule in a Vickers hardness number. But your shop only has a Rockwell hardness tester. A hardness chart is your answer.
The chart is one of the best ways to compare values. It lines up the different scales, like Rockwell C, Brinell, and Vickers. This lets you see which values are about the same. This helps you choose a suitable material when you are looking at various materials. For example, you can see that a Rockwell C value of 60 is much harder than a value of 20.
Using a hardness chart helps make sure that everyone understands each other. It connects the results from one hardness test to another. This is very important when you are working with different hardness rules from different sellers or clients. It helps you check that the hardness of your material meets the project’s needs, no matter what hardness scale was used.
Performing the test for material hardness in the right way is very important. I have seen a few mistakes that people often make that can give you the wrong hardness value. You can easily avoid them if you know what to look for.
A big mistake is not having a good surface on the test piece. The surface must be smooth, clean, and flat. A rough or dirty surface will give you a lower hardness value that is not correct. Another common mistake is making the dents too close to each other. They should also not be too close to the edge of the test piece. The changed material around one dent can mess up the next one. There are standard rules for how far apart to make them, so be sure to follow them.
Last, using the wrong test method or scale for the material is a classic mistake. You would not use a heavy Brinell hardness test on brittle materials such as ceramics; it would just break them. And you would not use a delicate Vickers hardness test on a rough part. Picking the right hardness test for the job is the first step to getting a good result for your material hardness.
Here is a quick review of the most important things to remember about the hardness of materials.