Tecrübemiz ve bilgi birikimimizle Istar'ın projenize başlamanıza yardımcı olmasına izin verin!
Tasarım dosyalarınızı ve üretim gereksinimlerinizi yükleyin ve 30 dakika içinde size geri dönelim!
If one thing makes a 3D print look good or great, it is the way it looks when it’s done. You can have a perfect design. But the layer lines you can see can make it look like something made at home for fun. What if I told you there is a simple way to make your ABS 3D prints look as smooth as things you buy in a store? This post is my own guide to ABS acetone smoothing. I will show you all the steps you need to know. We will go from the simple science to the exact steps I use to get a lovely, super smooth look every time. Reading this will save you time. It will also help you stay away from the usual problems that can mess up your hard work.
Let’s begin with the simple facts. ABS acetone smoothing is a step you do after the print is finished. It is for FDM 3D printed parts. When you print with an FDM printer, it puts down melted plastic, one layer at a time. This makes small lines or bumps that we call layer lines. They are an easy way to tell that a part was 3D printed. This is where the magic of ABS smoothing happens.
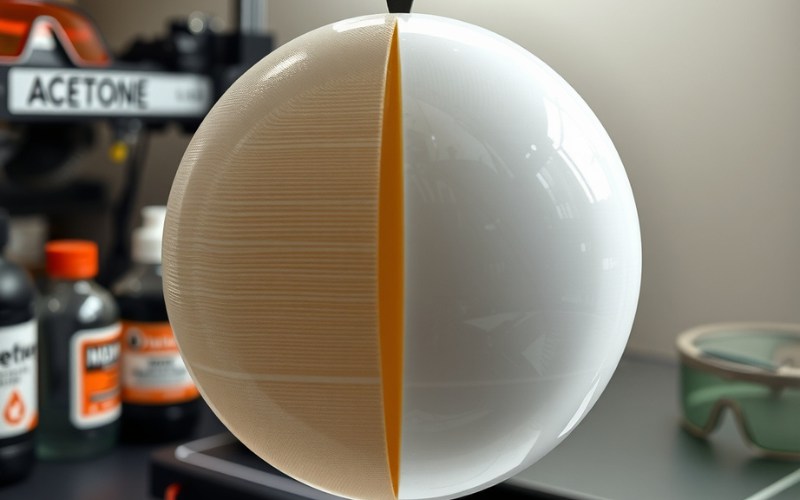
ABS is a type of 3D printing filament that many people use. It is a strong plastic. But what makes it special is that it can be dissolved by acetone. This means a solvent like acetone can dissolve it. When you put an ABS print near acetone vapors, the outside of the plastic melts a very small amount. This melting action makes the layer lines smooth out. It mixes them together to make one smooth and shiny surface. It is a great way to make your 3d printed abs parts look better. The final part is a 3d print that is smooth and looks very well-made.
You might be thinking, “Why do all this extra work?” I used to think that too. The biggest reason is to get a surface that is very smooth. A smooth abs part simply looks nicer. The layer lines are easy to see on parts with curves. Smoothing ABS prints with acetone can make them go away completely. This makes your parts look a lot like parts made in a factory. Getting a smooth surface is my main goal.
It’s not just about looks. Abs smoothing can also make your parts stronger. The layer lines in an FDM 3d printed part can be weak spots. By melting the outside layers together, the acetone smoothing process helps to join them. This can make the abs part stronger. It will be less likely to break along a layer. This is a big plus for abs components that need to do a job. It is the best way to smooth abs parts that need to be strong and look good. I always think my parts look more complete after a good smooth.
This is the most important part. Please read it with care. Acetone can be unsafe if you are not careful with it. Acetone is highly flammable, which means it catches fire very easily. The acetone fumes are also bad to breathe in. But if you do it the safe way, you can do this without any trouble. I have done ABS smoothing many, many times with no problems by sticking to these rules.
Here are my key safety tips. I never, ever miss one of them.
You must always exercise caution when smoothing. It is a simple job, but being safe is the number one thing.

Starting with abs acetone smoothing does not need a lot of special tools. You probably have some of these things in your house already. Here is a basic list of what I use to get a smooth part.
| Item | My Thoughts |
|---|---|
| A Glass Jar or Container | It needs a lid that closes tightly. A big glass pickle jar works well for a small abs part. A transparent smoothing box that you can see through is even better so you can see what’s happening. |
| Aseton | You must have 100% pure acetone. You can get this at a hardware store. The kind for removing nail polish will not work. |
| Paper Towels | To hold the acetone. Some people use tissue or paper towels. I think paper towels work best. |
| Aluminum Foil | I use this to make a little stand for my abs part to sit on. This stops it from sticking to the bottom. |
| Your ABS Print | The part you want to make smooth. This method does not work on PLA or PETG filaments. |
| Safety Items | Safety glasses and gloves. I said this before, but I want to say it again! |
This simple set of things is all you need for the vapor smoothing method. It is a simple and low-cost way to make your abs 3d prints look great and smooth.
This is my top method for smoothing 3d printed parts because it is simple and it works well. It is called the “cold” method because you do not use any heat. It works because the acetone turns into a gas all by itself, creating the acetone vapors.
Here are the steps I take for a perfect, smooth look. First, I get my jar ready. I take a few paper towels and get them wet with a small amount of acetone. You do not need to make them dripping wet, just damp. I then put them along the inside walls and bottom of the smoothing box. I check that the edges of the smoothing box are covered. Next, I make a small stand out of aluminum foil and put it in the middle of the jar. I make sure it is not touching the wet paper towels.
Then, I put my abs part on the foil stand. I put the lid on the container very tightly to keep the acetone fumes inside. The acetone vapors will fill up the jar and start to gently dissolve the outside of the abs print. I watch it carefully. This can take from 20 minutes to 2 hours. It depends on how big the part is and how much gas is in the jar. When the layer lines are gone and the outside looks shiny and smooth, I take the part out with care. It will be very soft, so I do not touch it. I let it sit where there is fresh air for a few hours to a few days to get completely hard. The part that is left is wonderfully smooth. This is the simplest way to smooth abs prints.
The hot vapor smoothing process is a quicker way to get a smooth surface. But, it is also more dangerous, so I do not use it as much. This way uses heat to make the acetone turn into a gas more quickly. This creates more of the acetone vapors in less time. People often do this by putting their container on the heated print bed of their 3D printer and setting it to a low temperature.
The main idea is the same as the cold way, but the heat makes everything happen faster. You must be very, very careful because you are heating a solvent that can catch fire easily. The chance of a fire is much higher. Also, the smoothing happens very fast. It is easy to do it for too long and turn your abs part into a melted mess. I feel that the cold acetone vapor bath lets me control the final surface finish better. If you are new to abs acetone smoothing, I really think you should use the cold method. It is safer and gives you a better feel for how it works.
Yes, you can apply liquid acetone right onto the part with a brush. This is another one of the smoothing methods I use for certain times. The brush and acetone way is good for very big parts that do not fit in a jar. It is also good for working on just one spot you want to make smooth.
To do this, I pour a little bit of acetone into a glass or ceramic bowl. Then, I dip the brush into the acetone. A small, soft paintbrush is a good choice. I use a flat brush to put it on smoothly. Then, I gently paint a very thin coat of acetone on the outside of the abs part. You will see the plastic begin to get shiny and smooth right away. The important thing here is to be quick and put on a very thin layer. If you apply acetone with too much on the brush, you can leave marks or make puddles that will melt the small details of your print. After you apply acetone with a brush, you still need to let the abs part dry until it is hard again. This way can give you a fairly smooth finish on abs. But it takes a bit more practice to get it to look even compared to the acetone vapor smoothing method.
This is a question I get a lot, and the answer is: it changes. The time it takes to get a smooth abs part can be different because of a few reasons. These reasons are the size of your abs part, the size of your jar, the temperature in the room, and how much acetone you use.
From my own work with the cold gas method, I usually see it start to work in about 20 to 30 minutes. For a really smooth, shiny look, I might leave the part in the acetone fumes for one or two hours. It is very important to check on your print a lot. After you take the part out of the jar, the smoothing does not stop right away. The abs plastic is still soft. The part needs to “air out” and get completely hard. This can take a few hours for a small part or a few days for a big one. You will get an idea of how long it takes after you do it a few times. Trying to go too fast at the end is a common mistake that can leave you with a messed-up, soft part. The goal is to get a hard, smooth surface.
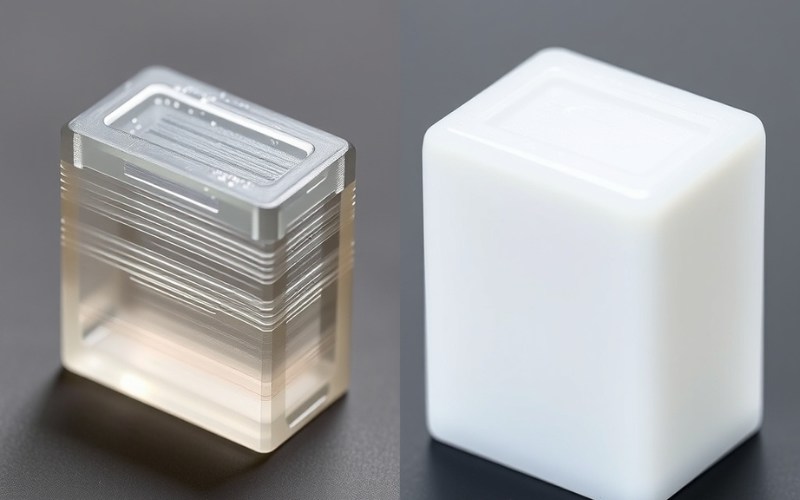
I have made plenty of mistakes over the years with smoothing with acetone. I got good at it by learning from them. The biggest mistake is making it too smooth. It is easy to get excited and leave your abs part in the acetone vapor bath for too long. This will dissolve too much plastic. You will melt away all the nice, sharp parts and corners. Your print will look like a melted blob of wax. Always watch your part carefully. Take it out when the layer lines are almost gone.
Another usual mistake is not letting the part dry all the way. A smoothed abs part can feel hard on the outside but still be soft deep inside. If you touch it before it’s ready, you can put fingerprints or marks in your nice, smooth surface finish. You have to wait. Also, check that your abs filament is just ABS. Some special types of 3d printing filament might not work with acetone in the same way. Always try it on a small, bad print first before you try abs smoothing on your best print.
While acetone vapor smoothing is my favorite post-processing technique for fdm 3d printed parts, it is not the only way. The most popular other choice is sanding. Sanding abs parts can also give you a very smooth look. I usually begin with rough sandpaper and change to smoother and smoother sandpaper. It takes a lot more work and time. But it lets you be in charge of how it looks. Sometimes I use both ways: I will do a quick sanding to get rid of the biggest bumps, then use acetone smoothing to get that last, shiny look.
For other 3d printing materials like PLA and PETG, you cannot use acetone. Those thermoplastics can be dissolved by other chemicals, but those chemicals are often more dangerous and not easy to find. For example, some people use chloroform and ethylene dichloride for PLA. But I do not suggest using them because they are bad for your health. For those materials, sanding is usually the safest and best way to get a smooth surface. But when you are working with abs filament, nothing works as well for speed and looks as a good acetone vapor smoothing job.
ABS acetone smoothing is a really great trick for anyone who prints with ABS filament. It is the secret to changing your 3D prints from objects that look homemade into parts that look like they were made by a pro. Here are the most important things to keep in mind from my guide: